
On my Rigid 6″ jointer, the knives tended to chip away at the tail ends of the board.
A friend offered me his 20-year-old Craftsman table saw and jointer if I would just help him get them out of his basement. Those are dependable old belt drive machines and well worth the effort of hauling several hundred pounds of steel up stairs. I started using that jointer and was pleased and surprised that it could make a perfectly straight board with a few passes.
The knives on the Rigid jointer were getting a bit dull, so I decided to have a go at sharpening them, using my bench grinder and finishing with a sharpening stone. Fairly happy with the results, I found it difficult to align the knives perfectly so that they were all at the same height.

My 12″ planer has small springs under the knives which push on a guide as I tighten them in place. The jointer is the opposite; the knives kept slipping down. When I thought I had it as good as I could get, I plugged the jointer back in and ran a board. The sound was rough and there were very obvious planer marks. Obviously, at least one blade was sitting higher than the others.
That’s when I discovered Jointer Pal, a simple tool that uses strong magnets to hold the knives in the right position while you tighten the screw. I ordered Jointer Pal and a new set of knives, installed them and now I have perfectly smooth boards.
Here’s how it works:
(1) ALWAYS unplug any tool before working on the knives.
(2) Using a straight edge, set the feed and outgoing tables on the jointer to the exactly same height
(3) Rotate the blade so that you determine exactly where the high point of the rotation is, and mark this on the jointer fence. You can watch the knife as it push on the straight edge to determine this location
(4) Remove and replace knives one at a time. The knives on my jointer are secured with nuts that can be loosened with a 3/8″ wrench. From the position shown in the pictures, you will actually be turning the nut clockwise, which is counter-intuitive. Be very careful– I’ve sliced a knuckle more than once when the wrench slipped. To avoid that, I secure my hand against the fence.
(5) Drop the new knife in, making sure it points in the correct direction, is centered in the cutter head, and that the tip of the knife aligns with the high point mark you made on the fence. I jammed a small wedge of wood between the cutter head and the body to hold it in that position.

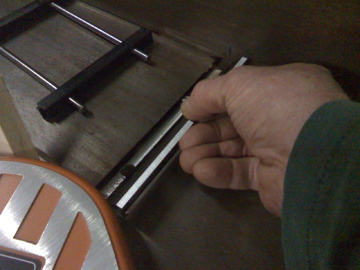
(6) Now set the Jointer Pal as shown in the picture. The strong magnets in the bar on the rear hold the tool in perfect alignment with the jointer table, and the other bar is set directly over the knife so that the magnets in that bar pull the knife up, tight to the bar. Making sure that the point of the blade is still aligned with the mark on the fence, tighten the screws in a counter-clockwise direction until each is snug, then finish tightening.
(7) Repeat this sequence for the other two knives, make sure all tools are out-of-the-way, plug-in the machine and your jointer will work beautifully.
